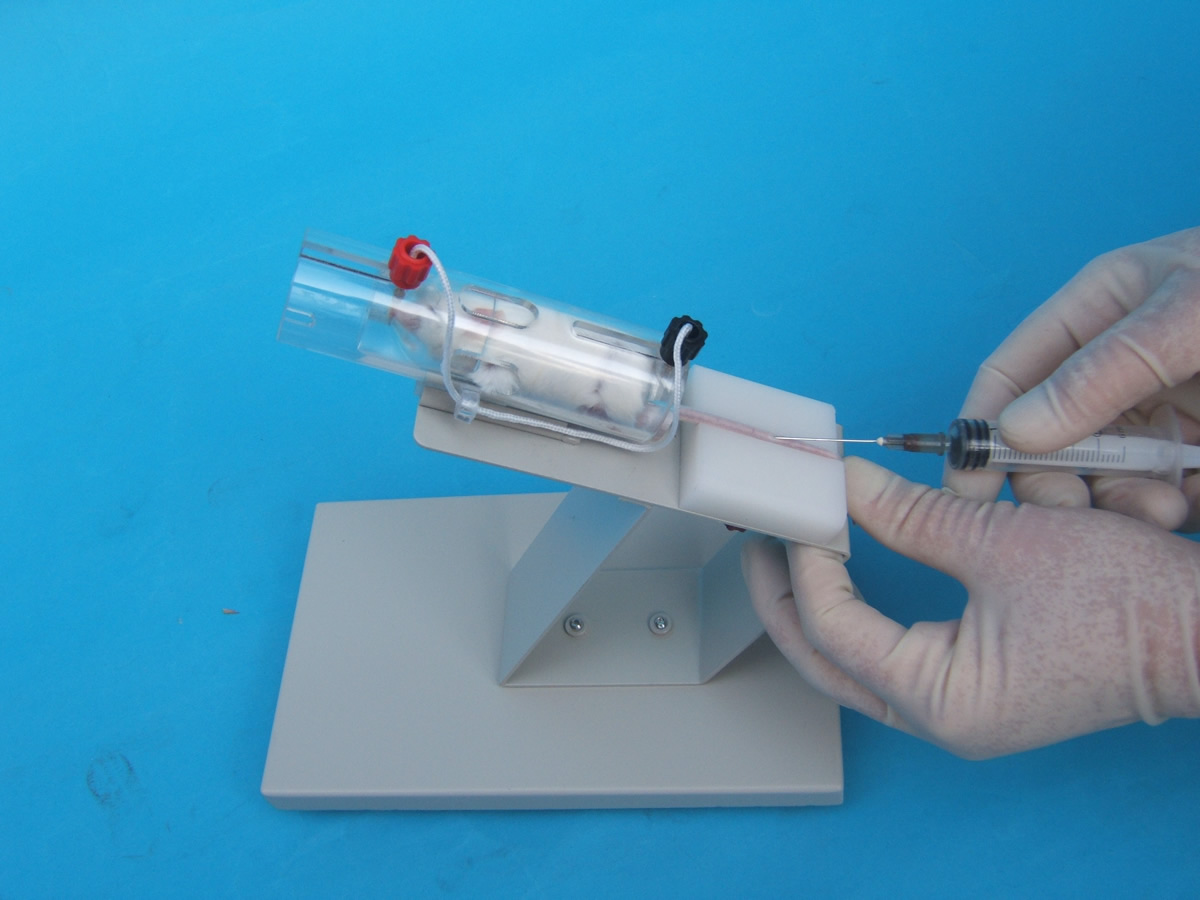
Mouse tail intravenous injection holder platform for administering tail vein injection in mice.
Specification of Tail Vein Injection Platform
Available for mice: 15~50g
Overall dimensions: 210×120×230mm
Net weight: 600g
Operation Manual of Tail Vein Injection Holder
Assembly of the Holder:
- Connect the bracket holder to the base platform using the two screws provided on the holder.
- Insert the mouse tube into the dovetail groove on the bracket holder, then tighten the fastening screws located underneath it.
Adjustment of the Fixing Bracket:
- Remove the end cover and front plug of the mouse tube.
- Place the empty mouse tube on the platform evenly.
- Lift the mouse tail and allow it to climb into the mouse fixing tube from the rear.
- Replace the front plug and tighten the rear cover so that the mouse tail is now out from the back of the fixing tube.
- Slide the front pin to provide a comfortable space for the mouse.
- If the mouse is too small, stuff the front end of the mouse tube.
Mouse Tube Position Adjustment:
- The dovetail slot can be used to slide the mouse tube to accommodate different lengths of mouse tails.
- Tighten the screw after fixing the mouse tube in place.
Adjustment of the Spacer:
- The mouse tail spacer can be adjusted left or right using the fastening screw located under the spacer to ensure that the mouse tail is in a central position.
- If the spacer and groove cannot appropriately adjust the tail, change to another screw hole.
After the mouse is in the operation position, turn the tail 90° and fix it with the spacer. Then, use a 5# needle to administer the medication by injecting a small amount. If there is no resistance, it means the needle is in the vein.
Ensure that the tail does not swing during the injection. If the injection is a long-term procedure, start the injection point 2-3mm from the end of the tail to keep the vessels clear from the end to the front.
Maintenance and Precautions
- The fixing tube is made of plexiglass, which is fragile. Avoid collisions when using the mouse fixing tube. If there are minor damages, trichloromethane can be used to fix them.
- Clean the tube using conventional detergent and avoid using organic solvents such as ethanol or ether.
- Clean the intravenous injection holder platform promptly if any liquid or blood drips onto it during the injection or blood sampling.
- Keep in mind that mice tail intravenous injection requires practice and patience, and the operators may become frustrated if they are unable to successfully administer the injection several times.
Why Mouse Tail Intravenous Injection is Challenging to Master
- Fixing the mouse and tail is the critical factor.
- A sufficient blood flow in the mouse tail.
- The direction of the needle during injection.
- If you can overcome these three difficulties, then the injection will become an easier task.
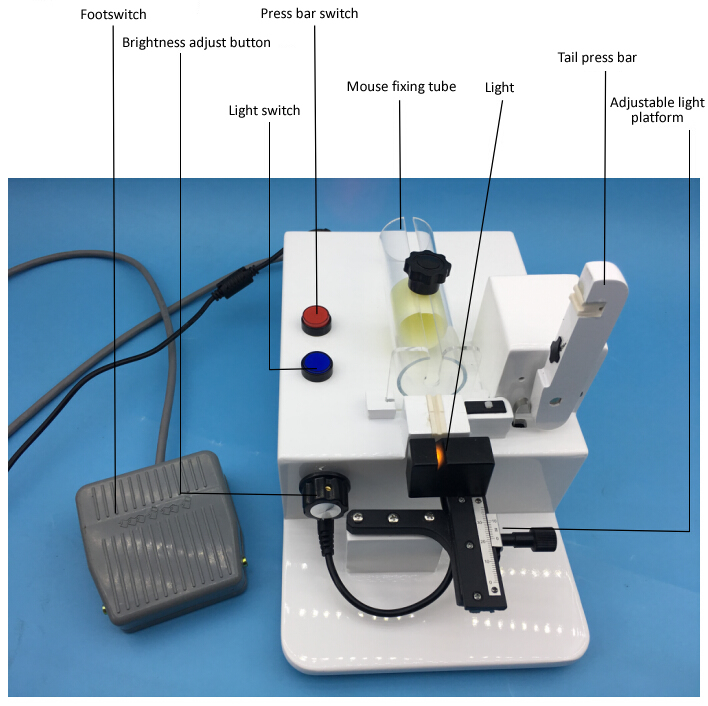
Magnifier Visual Tail Intravenous Injection Platform
The Magnifying Visual Mouse Tail Vein Injection Holder is a device that helps to simplify the process of intravenous injection in mice.
The fixing tube holder securely secures the mouse, reducing discomfort and ensuring that the mouse does not move during the injection. The device uses a specialized light to illuminate the tail of the mouse, making the blood vessels visible and making it easier to target the injection site. You can confirm that the needle is in the vein by slightly moving it and observing if the blood vessel follows the movement. With practice, you will be able to perform the injection without the use of the visual light device. This efficient injection platform makes it easier to master the tail vein injection method.
This new method represents a significant advancement in mouse tail intravenous injections.
Mouse Visual Tail Vein Injection Holder Specifications
- 0.5W LED light
- 5.0X magnifier
- Foot switch
- Input: AC 100-200V
- Output: DC 12V 1A/2A
- Dimensions: 220*140*125cm
- Net weight: 1.8kg
Instructions for the Visual Tail Injection Holder
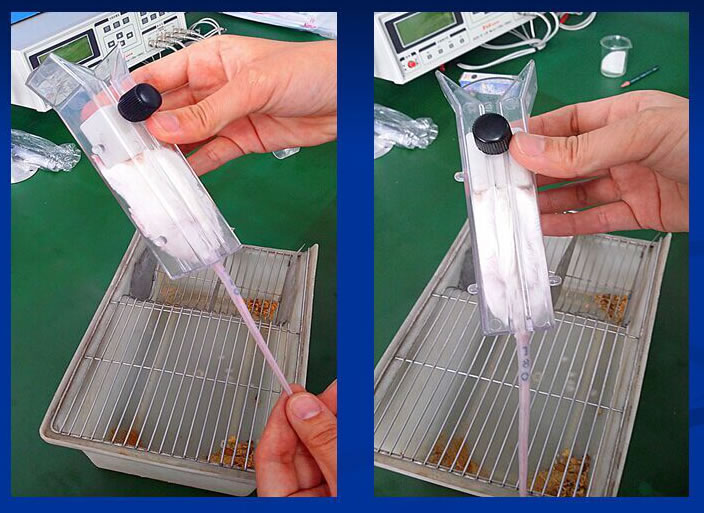
The conventional method of fixing the mouse involves allowing the mouse to climb into the tube, but after several injections, the mouse may avoid doing so due to the narrowing and uncomfortable experience. To overcome this issue, the mouse fixing tube has been improved to a fast type that quickly secures the mouse.
To secure the mouse, the operator pulls the mouse into the tube and uses the front plug to fix the mouse’s head. The specially designed plug does not interfere with the mouse’s breathing and provides enough room for the mouse. The plug’s position should be adjusted based on the principle of no free movement of the mouse and without affecting the mouse’s lung expansion (observe the mouse through the transparent plexiglass and adjust the front plug accordingly).
Once the mouse is secured in the tube, place the tube with the fixed mouse on the holding platform and pass the mouse tail through the end cover. Then, press the mouse tail into the platform’s groove. Turn on the light switch and observe the blood vessels in the mouse tail. Adjust the brightness of the yellow light to make sure the blood vessels are clearly visible. Note that the high brightness of the environment may affect the visibility of the blood vessels, so it is recommended to perform the operation in a darker room.
For injection, the operator should start the needle point 2-3mm from the end of the tail, taking into account the size of the mouse, to avoid leakage. Due to the different tail lengths of mice, the injection site may need to be adjusted accordingly. The needle used for injection should be smaller than a 5# needle; 4.5# and 4# needles are suitable. Larger needles, such as 5# and above, may cause more significant wounds and be difficult to stop bleeding. A scalp needle connected to a 1ml syringe can also be used to confirm that the syringe is in the blood vessel. Regardless of the needle type, it is important to know the location of the blood vessel to make the injection process easier. The best way to confirm if the syringe is in the blood vessel is by slightly swinging the needle and observing if it moves with the blood vessel.
Packing List for the Visual Mouse Tail Vein Injection Platform
| Item | Quantity |
| Visual vein platform | 1 |
| AC100-220V 50Hz power adapter | 1 |
| 220V power cord | 1 |
| Footswitch | 1 |
| Mouse holder tube | 1 |
| Manual | 1 |
Related products